
By: Vivek Kumar Maskara
As a security measure, card issuers allow their users to dispute a transaction in case of fraud, theft, or other legitimate scenarios. When a customer disputes a transaction, you, as the merchant, need to act fast to review the dispute before it escalates into a chargeback, which refers to a forced reversal of funds initiated by the cardholder’s bank. If your chargeback ratio rises too high, you could face penalties or even lose your ability to receive card payments altogether.
Rapid Dispute Resolution (RDR) enables merchants to automate their dispute response with predefined rules that allow instant review and automatic refunds for certain scenarios. Rapyd is an all-in-one payment platform that integrates directly with Visa and Mastercard acquirers, helping merchants improve their authorization rates and act against chargebacks.
In this article, you’ll learn how to use the Rapyd API to automatically resolve low-value Mastercard transaction disputes.
Understand Dispute Resolution with Mastercard Collaboration
RDR is a fully automated dispute management solution for merchants that was initially championed by Visa in collaboration with Verifi. Mastercard Collaboration offers a similar capability for Mastercard-issued cards, enabling merchants to resolve disputes before a chargeback can occur. The following diagram illustrates the dispute resolution flow with Mastercard Collaboration:
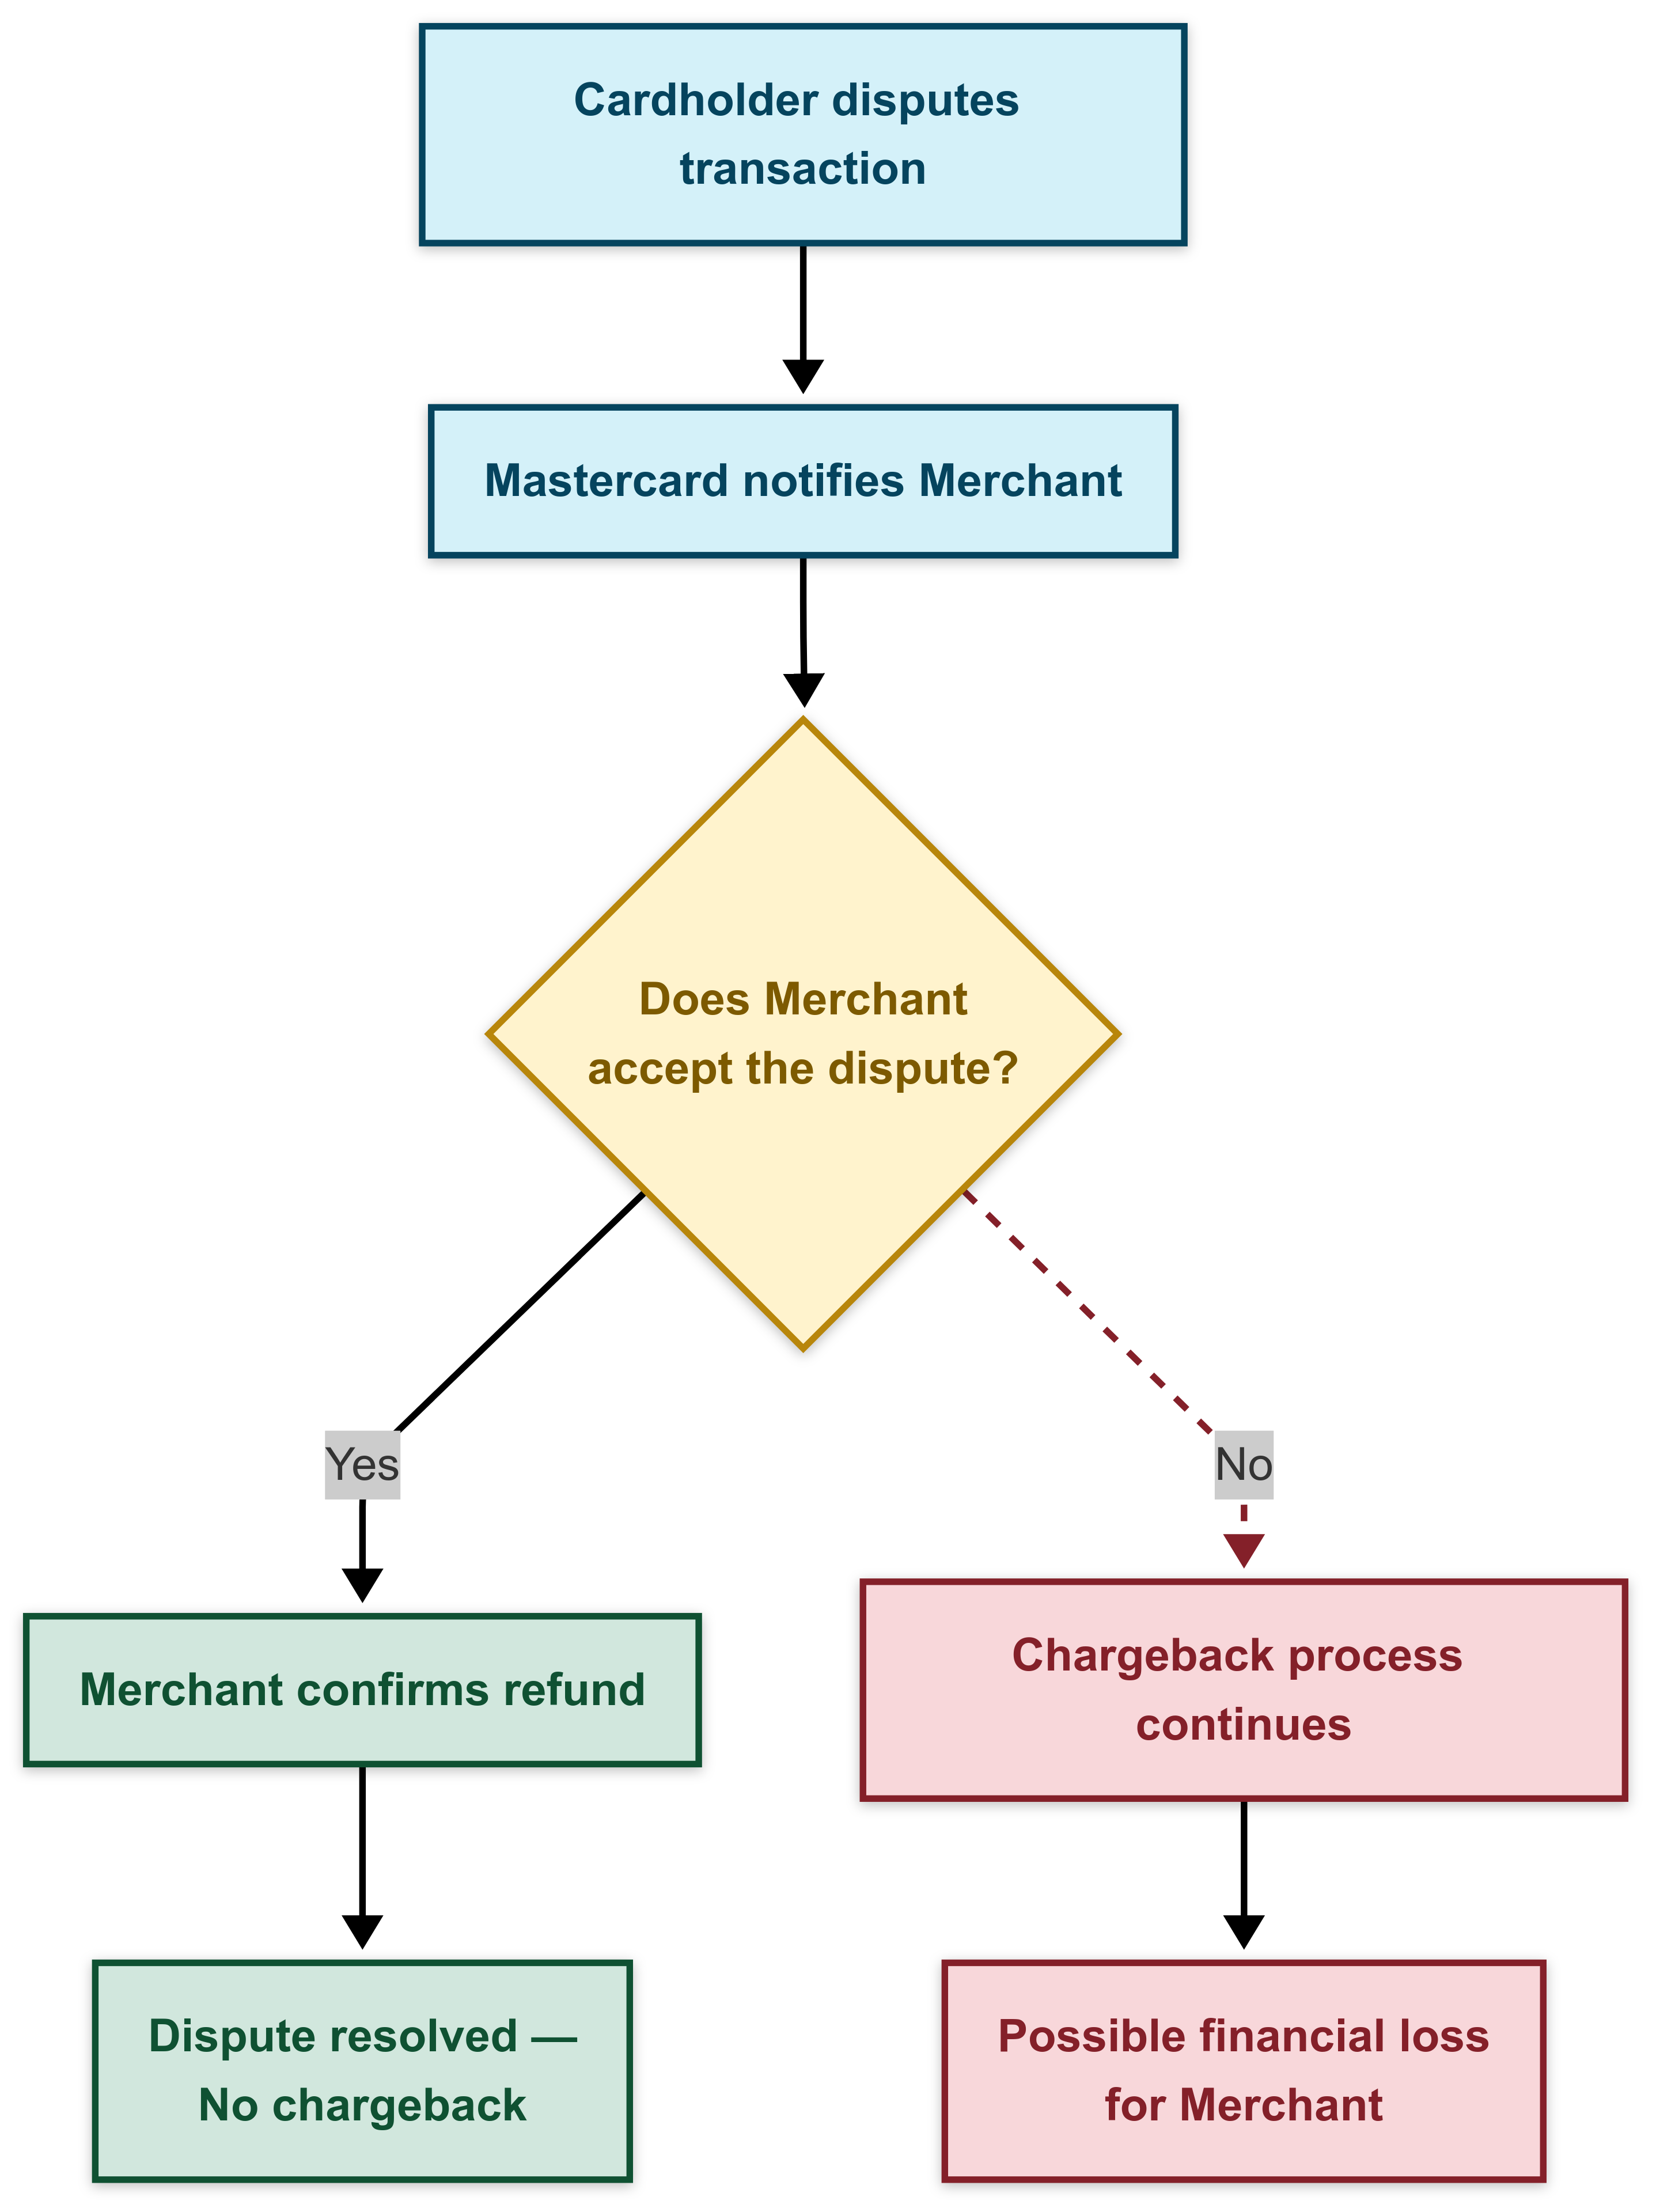
Collaboration alerts the merchant as soon as the transaction is disputed, allowing merchants to review the cardholder complaint and issue a refund if needed. If the merchant refunds the transaction, a chargeback is no longer needed, and Mastercard marks the dispute as resolved. If the refund is not processed, the dispute advances to the chargeback step, and the Collaboration process is completed.
As a merchant receiving payments through multiple payment methods, including Visa and Mastercard, integrating with multiple dispute resolution solutions can be challenging. Rapyd simplifies this by offering direct integration with both Visa and Mastercard, enabling seamless dispute resolution implementation within your application:
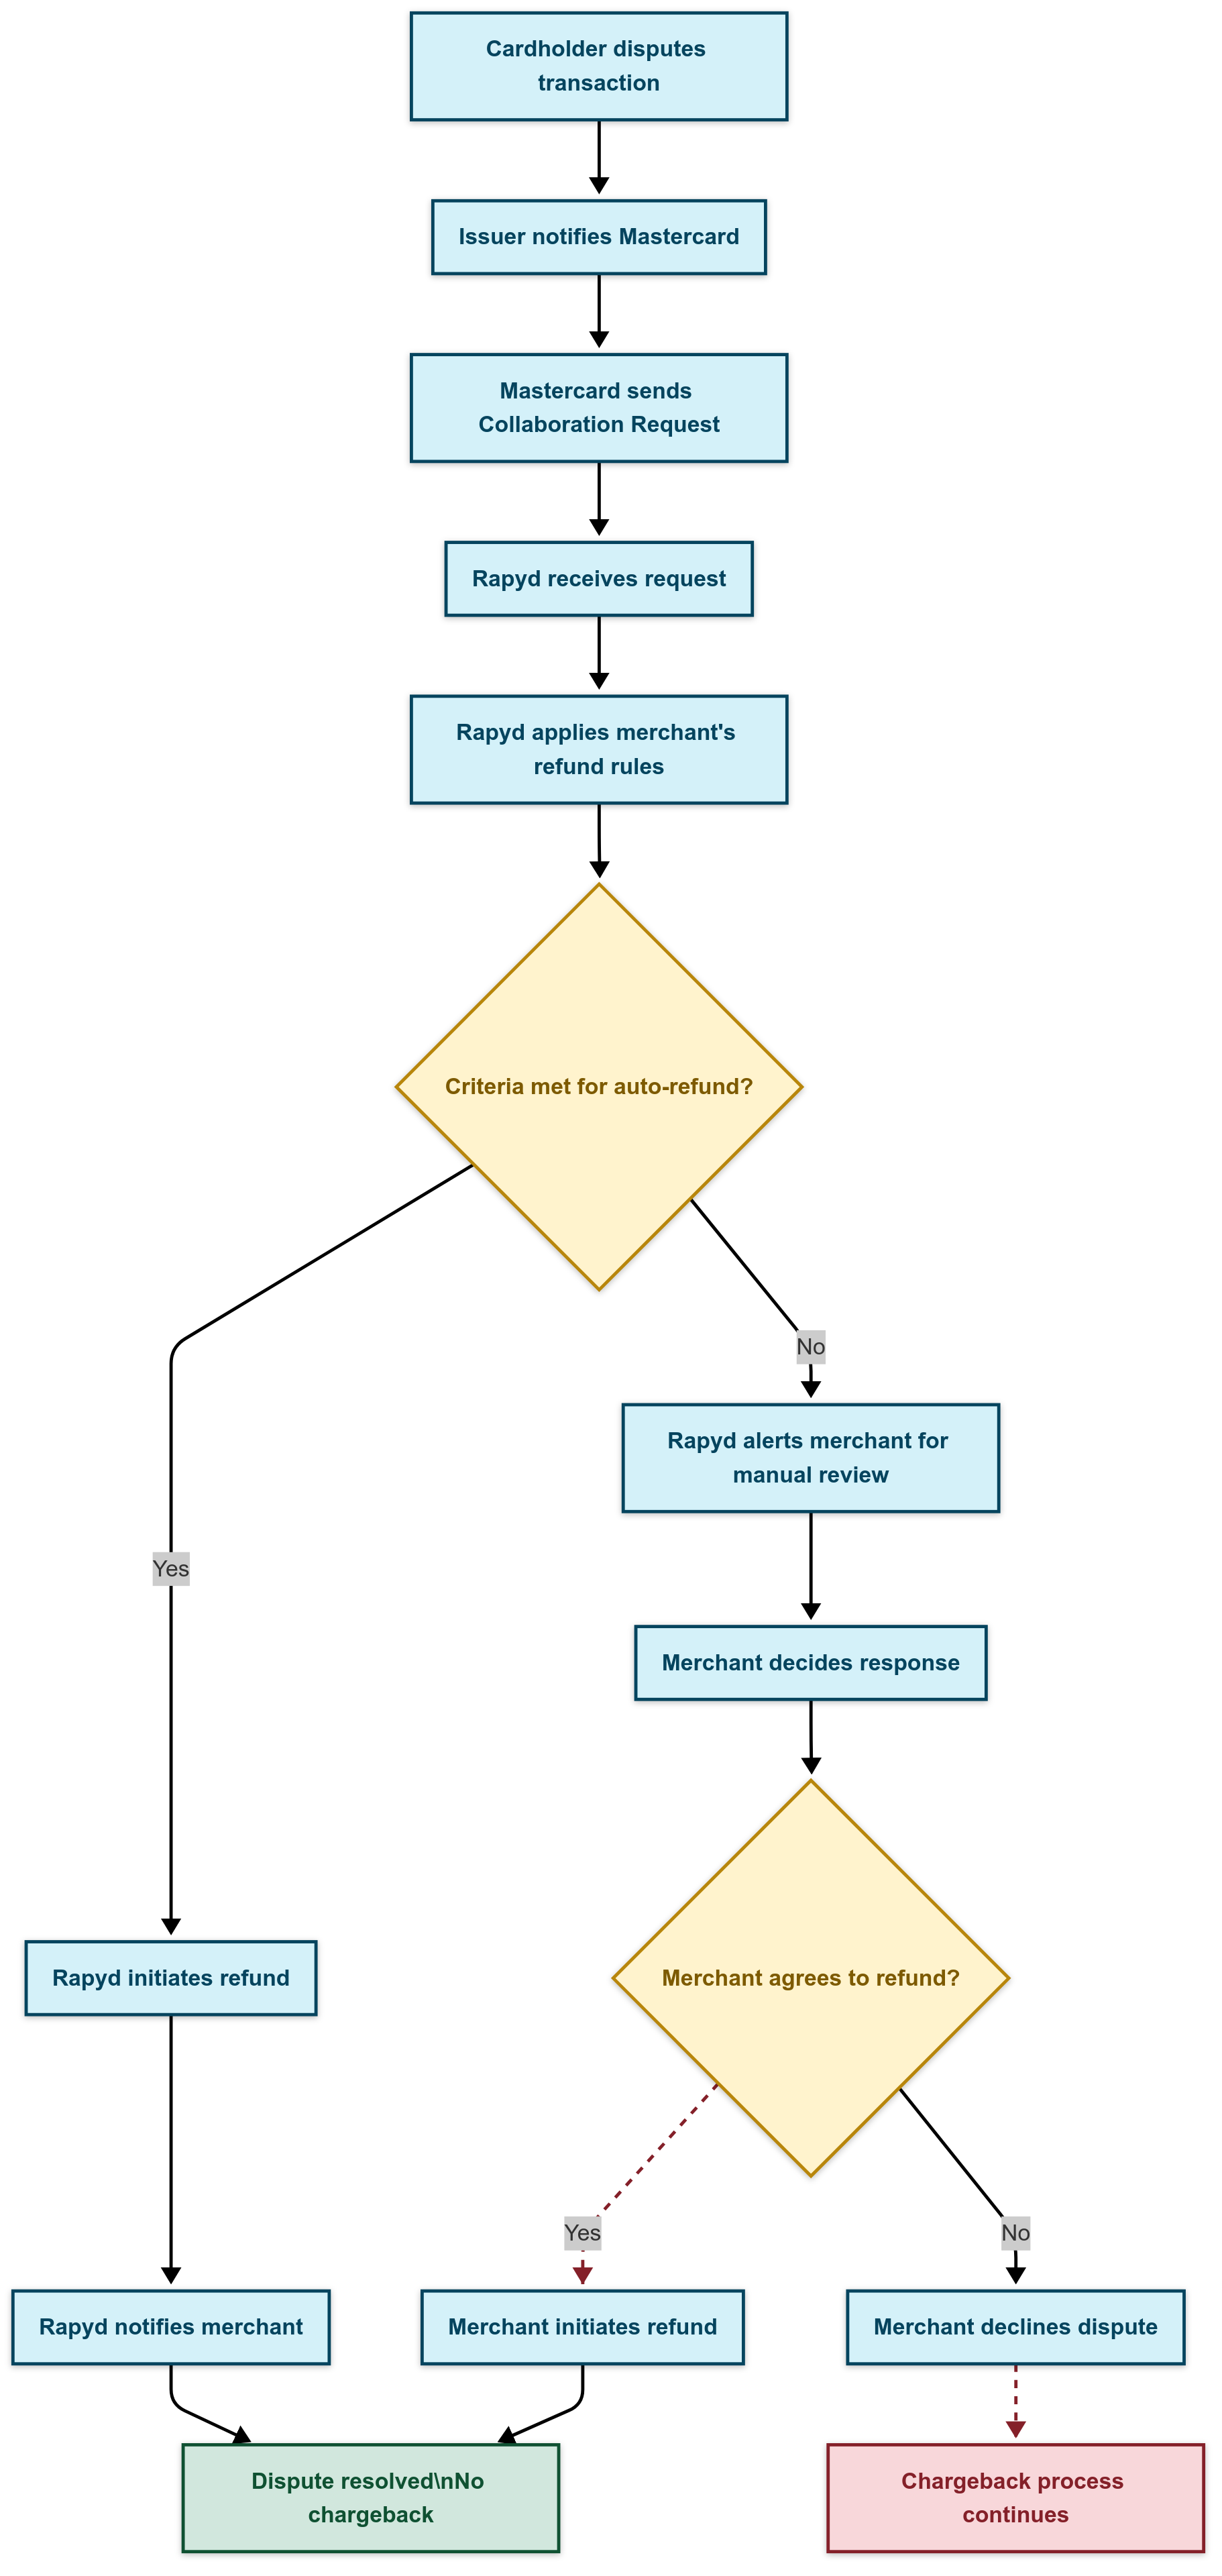
Rapyd lets merchants define automatic refund rules using the Client Portal to determine the conditions under which an automatic refund should be issued. When Rapyd receives a dispute notification from Mastercard Collaboration, it evaluates the merchant-defined rules, and if the criteria are met, it issues an automatic refund without merchant intervention. Otherwise, it notifies the merchant by sending a PAYMENT_DISPUTE_CREATED webhook event, and the merchant can perform additional checks before deciding the outcome.
Implement Mastercard Dispute Resolution with Rapyd
In this tutorial, you’ll create an Express application that makes a Mastercard card payment request using Rapyd APIs and listens to webhook events for dispute resolution. By the end of the tutorial, you’ll learn how to do the following:
- Make a signed Rapyd API request for payment and disputes.
- Set up a webhook that listens to payment and dispute creation events and lets you take custom actions.
- Send an email to the merchant notifying them about the dispute details.
Prepare Prerequisites
Before starting, you need to complete the following actions:
- Sign up for a Rapyd account.
- Set up your Rapyd account.
- Install Node.js 18.0 or above on your development machine.
- Install and set up ngrok.
This tutorial uses this starter code from GitHub that has a barebones Node.js app set up. To follow along, clone the GitHub repo and switch to the starter branch by following these steps:
git clone https://github.com/Rapyd-Samples/dispute-resolution-mastercard
cd rapyd-payments
git checkout starter
Let’s go over the structure of the codebase:
- The
package.jsonfile defines the Express project dependencies and thenpm startscript. - The
srcdirectory contains the main source code, including theindex.jsentry point, which initializes the Express server by creating a new instance of theApp. - The
src/services/rapyd.utilities.jsfile defines methods to make a signed HTTPS request to Rapyd servers. It defines themakeRequestmethod that takes the HTTPmethodtype,url, andbodyas parameters, and it returns the Rapyd API response to the caller. This method uses thesignmethod to sign the payload before making the REST API call. If you want to learn more about the signing process, check out this Rapyd guide.
Set Up Your Rapyd Access Key and Secret Key
Notice that the source contains .env.example, which is a sample environment file. Rename the file to .env and replace the values for RAPYD_API_KEY and RAPYD_SECRET_KEY with your credentials, which you can access on the Rapyd Client Portal:
RAPYD_API_KEY=<REPLACE_WITH_RAPYD_ACCESS_KEY>
RAPYD_SECRET_KEY=<REPLACE_WITH_RAPYD_SECRET_KEY>
BASERAPYDAPIURL=https://sandboxapi.rapyd.net
Install Dependencies and Run the App
After familiarizing yourself with the code, install the npm dependencies by executing the following command:
npm install
You can now run the starter code to verify your setup. Execute the following command to run the app:
npm run start
Your output looks like this:
App initialized
🚀 Server running on http://localhost:8000
Since the .env file defines the application port as 8000, the server starts running on this port. You can open a new terminal window and use curl to verify that the default endpoint is accessible by executing the following:
curl -i http://localhost:8000/api
Your output looks like this:
Welcome to the Rapyd Payment API
Now that the starter code is set up, you can proceed to integrate Rapyd payment and dispute resolution APIs.
Integrate Rapyd APIs to Receive Payments
This section explains how to integrate Rapyd APIs to receive payments, retrieve dispute status, and issue refunds. For this tutorial, the Node.js application doesn’t define strict request schemas and simply relays the request payload to Rapyd. You’ll integrate the following Rapyd APIs:
POST v1/payments/to create a new card paymentGET v1/payments/to retrieve details of a paymentGET v1/payments/to retrieve details of a paymentPOST v1/refundsto create a refund (Note that this tutorial doesn’t directly use the refund endpoint, but the integration details are covered here for completeness.)GET v1/disputes/{disputeID}to retrieve details of a dispute
Before starting the integration, refer to the linked API docs earlier for details about the request parameters.
You can utilize the makeRequest method defined in the starter code to send a signed request to Rapyd servers. To integrate the APIs, update the src/services/rapyd.service.js file with the following code snippet:
import { makeRequest } from './rapyd.utilities.js';

class RapydService {
  static async createPayment(paymentData) {
    const url = '/v1/payments';
    return makeRequest('POST', url, paymentData);
  }

  static async getPaymentStatus(paymentId) {
    const url = `/v1/payments/${paymentId}`;
    return makeRequest('GET', url);
  }

  static async refundPayment(refundData) {
    const url = '/v1/refunds';
    return makeRequest('POST', url, refundData);
  }

  static async getDisputeById(disputeId) {
    const url = `/v1/disputes/${disputeId}`;
    return makeRequest('GET', url);
  }
}

export default RapydService;
The newly defined methods relay the request payload to the makeRequest method and return the response received from it. Next, you need to update the controller to use the service methods for payment, disputes, and refunds. Update the src/controllers/payment.controller.js with the following code snippet:
import RapydService from '../services/rapyd.service.js';

class PaymentController {
  static async createPayment(req, res, next) {
    try {
      const payment = await RapydService.createPayment(req.body);
      res.status(201).json({ success: true, data: payment });
    } catch (error) {
      next(error);
    }
  }

  static async getPaymentStatus(req, res, next) {
    try {
      const paymentStatus = await RapydService.getPaymentStatus(req.params.id);
      res.status(200).json({ success: true, data: paymentStatus });
    } catch (error) {
      next(error);
    }
  }

  static async refundPayment(req, res, next) {
    try {
      const refund = await RapydService.refundPayment(req.body);
      res.status(200).json({ success: true, data: refund });
    } catch (error) {
      next(error);
    }
  }

  static async getDisputeById(req, res, next) {
    try {
      const dispute = await RapydService.getDisputeById(req.params.id);
      res.status(200).json({ success: true, data: dispute });
    } catch (error) {
      next(error);
    }
  }
}

export const { createPayment,
  getPaymentStatus,
  refundPayment,
  getDisputeById } = PaymentController;
export default PaymentController;
In this code snippet, every controller method parses the req object and utilizes the RapydService methods to define createPayment, getPaymentStatus, refundPayment, and getDisputeById methods. If the RapydService throws an error, the controller method catches the error and returns a next(error) API error response.
Update the src/routes.js file to define the new API routes:
// Add this import statement
import {
    createPayment,
    getPaymentStatus,
    refundPayment,
    getDisputeById
} from './controllers/payment.controller.js';

// Add payment routes
router.post('/payment', createPayment);
router.post('/payment/:id/refund', refundPayment);
router.get('/status/:id', getPaymentStatus);
router.get('/disputes/:id', getDisputeById);
After these routes are added, the Express application can be used to create card payments and check their status.
Test Payment Integration
Now that you’ve added the payment endpoints in the Node.js application, you can test payments using Mastercard sandbox cards. Execute the following curl command that uses one of the sandbox cards to create a payment:
curl --location 'http://localhost:8000/api/payment' \
--header 'Content-Type: application/json' \
--data-raw '{
    "amount": 26.51,
    "currency": "ZAR",
    "merchant_reference_id": "042620221450",
    "payment_method": {
        "type": "gb_mastercard_card",
        "fields": {
            "number": "5102589999999913",
            "expiration_month": "11",
            "expiration_year": "26",
            "cvv": "123",
            "name": "John Doe"
        }
    },
    "ewallets": [
        {
            "ewallet": "<YOUR_RAPYD_EWALLET_ID>",
            "percentage": 100
        }
    ],
    "metadata": {
        "merchant_defined": "created"
    },
    "capture": true,
    "payment_method_options": {
        "3d_required": false
    }
}'
Make sure to replace <YOUR_RAPYD_EWALLET_ID> with a Rapyd Wallet ID. You can create a new wallet or retrieve an existing wallet ID using the Rapyd Developer Portal. Refer to the Create Payment API reference to learn more about the request payload.
After you execute the curl command, you should receive a success response with payment details and status:
{
  "success": true,
  "data": {
    "statusCode": 200,
    ...
    "body": {
      ...
      "data": {
        "id": "payment_1e8c9b2cf200882954bfe49fa550476c",
        "amount": 26.51,
        "original_amount": 26.51,
        ...
        "customer_token": "cus_33ea7f84366b2b092a2c210faa5c31b1",
        "payment_method": null,
        ...
      }
    }
  }
}
You can also check the payment details using the Collect > Payments page on the Rapyd Client Portal. Similarly, you can test other API endpoints by grabbing sample payloads from the API docs.
Set Up a Webhook to Notify the Merchant About Disputes
Now that you have the payment integration set up, you can create a webhook to listen to Rapyd payment and dispute events, and send an email with dispute details to the merchant.
Configure Email Service
In this tutorial, you’ll learn how to send emails using Nodemailer, but in a real-world application, you can perform other custom actions upon receiving a webhook event.
To start, install the nodemailer npm package by executing the following command:
npm install nodemailer
The command installs the package and updates package.json and package-lock.json files.
Next, create a services/email.service.js file and add the following code snippet to it:
import nodemailer from 'nodemailer';
import { emailConfig, merchantEmail } from '../config.js';

class EmailService {
    constructor() {
        this.transporter = nodemailer.createTransport({
            service: emailConfig.service,
            auth: {
                user: emailConfig.user,
                pass: emailConfig.pass
            }
        });
    }

    async sendDisputeNotification(disputeData) {
        const { token, original_dispute_amount, original_transaction_id, currency } = disputeData;

        const emailContent = `
        Payment Dispute Alert

        Dispute Details:
        - Dispute ID: ${token}
        - Original Transaction ID: ${original_transaction_id}
        - Dispute Amount: ${original_dispute_amount} ${currency || 'USD'}
        - Date: ${new Date().toLocaleString()}

        Action Required:
        A dispute has been created for one of your transactions. Please review the dispute details and take appropriate action.

        This is an automated notification for demonstration purposes.`;

        const mailOptions = {
            from: emailConfig.user,
            to: merchantEmail,
            subject: `Payment Dispute Created - ${token}`,
            text: emailContent
        };

        try {
            const info = await this.transporter.sendMail(mailOptions);
            console.log('Dispute notification email sent:', info.response);
            return { success: true, messageId: info.messageId };
        } catch (error) {
            console.error('Error sending dispute notification email:', error);
            throw error;
        }
    }
}

export default new EmailService();
This code creates a new mail transport by calling the createTransport method in the service constructor. This transport is used to deliver an email over SMTP.
This code also defines a sendDisputeNotification method that takes disputeData as input, constructs the email body and subject, and calls the sendMail to send an email to the merchant.
Note that the email service requires an emailConfig to be defined with sender and receiver email details. Add the following details in the config.js file to configure the email details:
export const emailConfig = {
    service: process.env.EMAIL_SERVICE || 'gmail',
    user: process.env.EMAIL_USER || '',
    pass: process.env.EMAIL_PASS || '',
};

export const merchantEmail = process.env.MERCHANT_EMAIL || '';
Add the following environment variables to the .env file to configure the email service:
EMAIL_SERVICE=gmail
EMAIL_USER=your_email@gmail.com
EMAIL_PASS=your_email_password_here
MERCHANT_EMAIL=merchant@example.com
Note that if you’re using Gmail, you need to configure OAuth 2.0 or generate an app password. This tutorial uses Gmail, but you can refer to the Nodemailer docs if you need to configure a custom SMTP transport.
Handle the Dispute Webhook
The PAYMENT_DISPUTE_CREATED webhook event contains information about the dispute, payment, and payment method. For example, you can retrieve the original_transaction_id to fetch transaction details.
Add the handleDisputeCreated method in the controllers/webhook.controller.js file as follows:
// add import
import EmailService from '../services/email.service.js';

const handleDisputeCreated = async (disputeData) => {
    const { token } = disputeData;
    console.log(`Dispute ID: ${token}`);

    try {
        await EmailService.sendDisputeNotification(disputeData);
        console.log(`Email notification sent for dispute: ${token}`);
    } catch (error) {
        console.error('Error handling dispute:', error);
    }
};
The method calls the EmailService.sendDisputeNotification method with the disputeData to notify the merchant about the dispute.
Next, update the handleWebhook method to call the dispute handler like this:
export const handleWebhook = (req, res) => {
    const event = req.body;
    switch (event.type) {
        ...
        case 'PAYMENT_DISPUTE_CREATED':
            console.log('Payment dispute created:', event.data);
            handleDisputeCreated(event.data);
            break;
        ...
    }
    ...
};
Now that the webhook is configured to send emails automatically, you can proceed to test the integration.
Test Automatic Dispute Resolution for Mastercard Transactions
Before testing the integration, you need to register the webhook endpoint on the Rapyd Client Portal to receive dispute events.
Register the Webhook
You need to expose Express on a public URL so that Rapyd can send webhook events to it. You can use ngrok to expose your web server as a public URL by executing the following command:
ngrok http http://localhost:8000
Once you execute the command, it creates a public proxy, and your output looks like this:
ngrok
...
Session Status                online
---OUTPUT TRUNCATED---
Forwarding                    https://3939-2601-602-9700-5c30-b883-8d8b-8def-708b.ngrok-free.app -> http://localhost:8000
Note the forwarding URL and navigate to the Rapyd Client Portal to register it. Under Developers > Webhooks > Management, click Edit URL and update the endpoint to the following:
https://<YOUR_FORWARDING_HOST_NAME>/api/webhook
Replace <YOUR_FORWARDING_HOST_NAME> with the forwarding URL’s hostname. Make sure you save the changes for it to take effect:
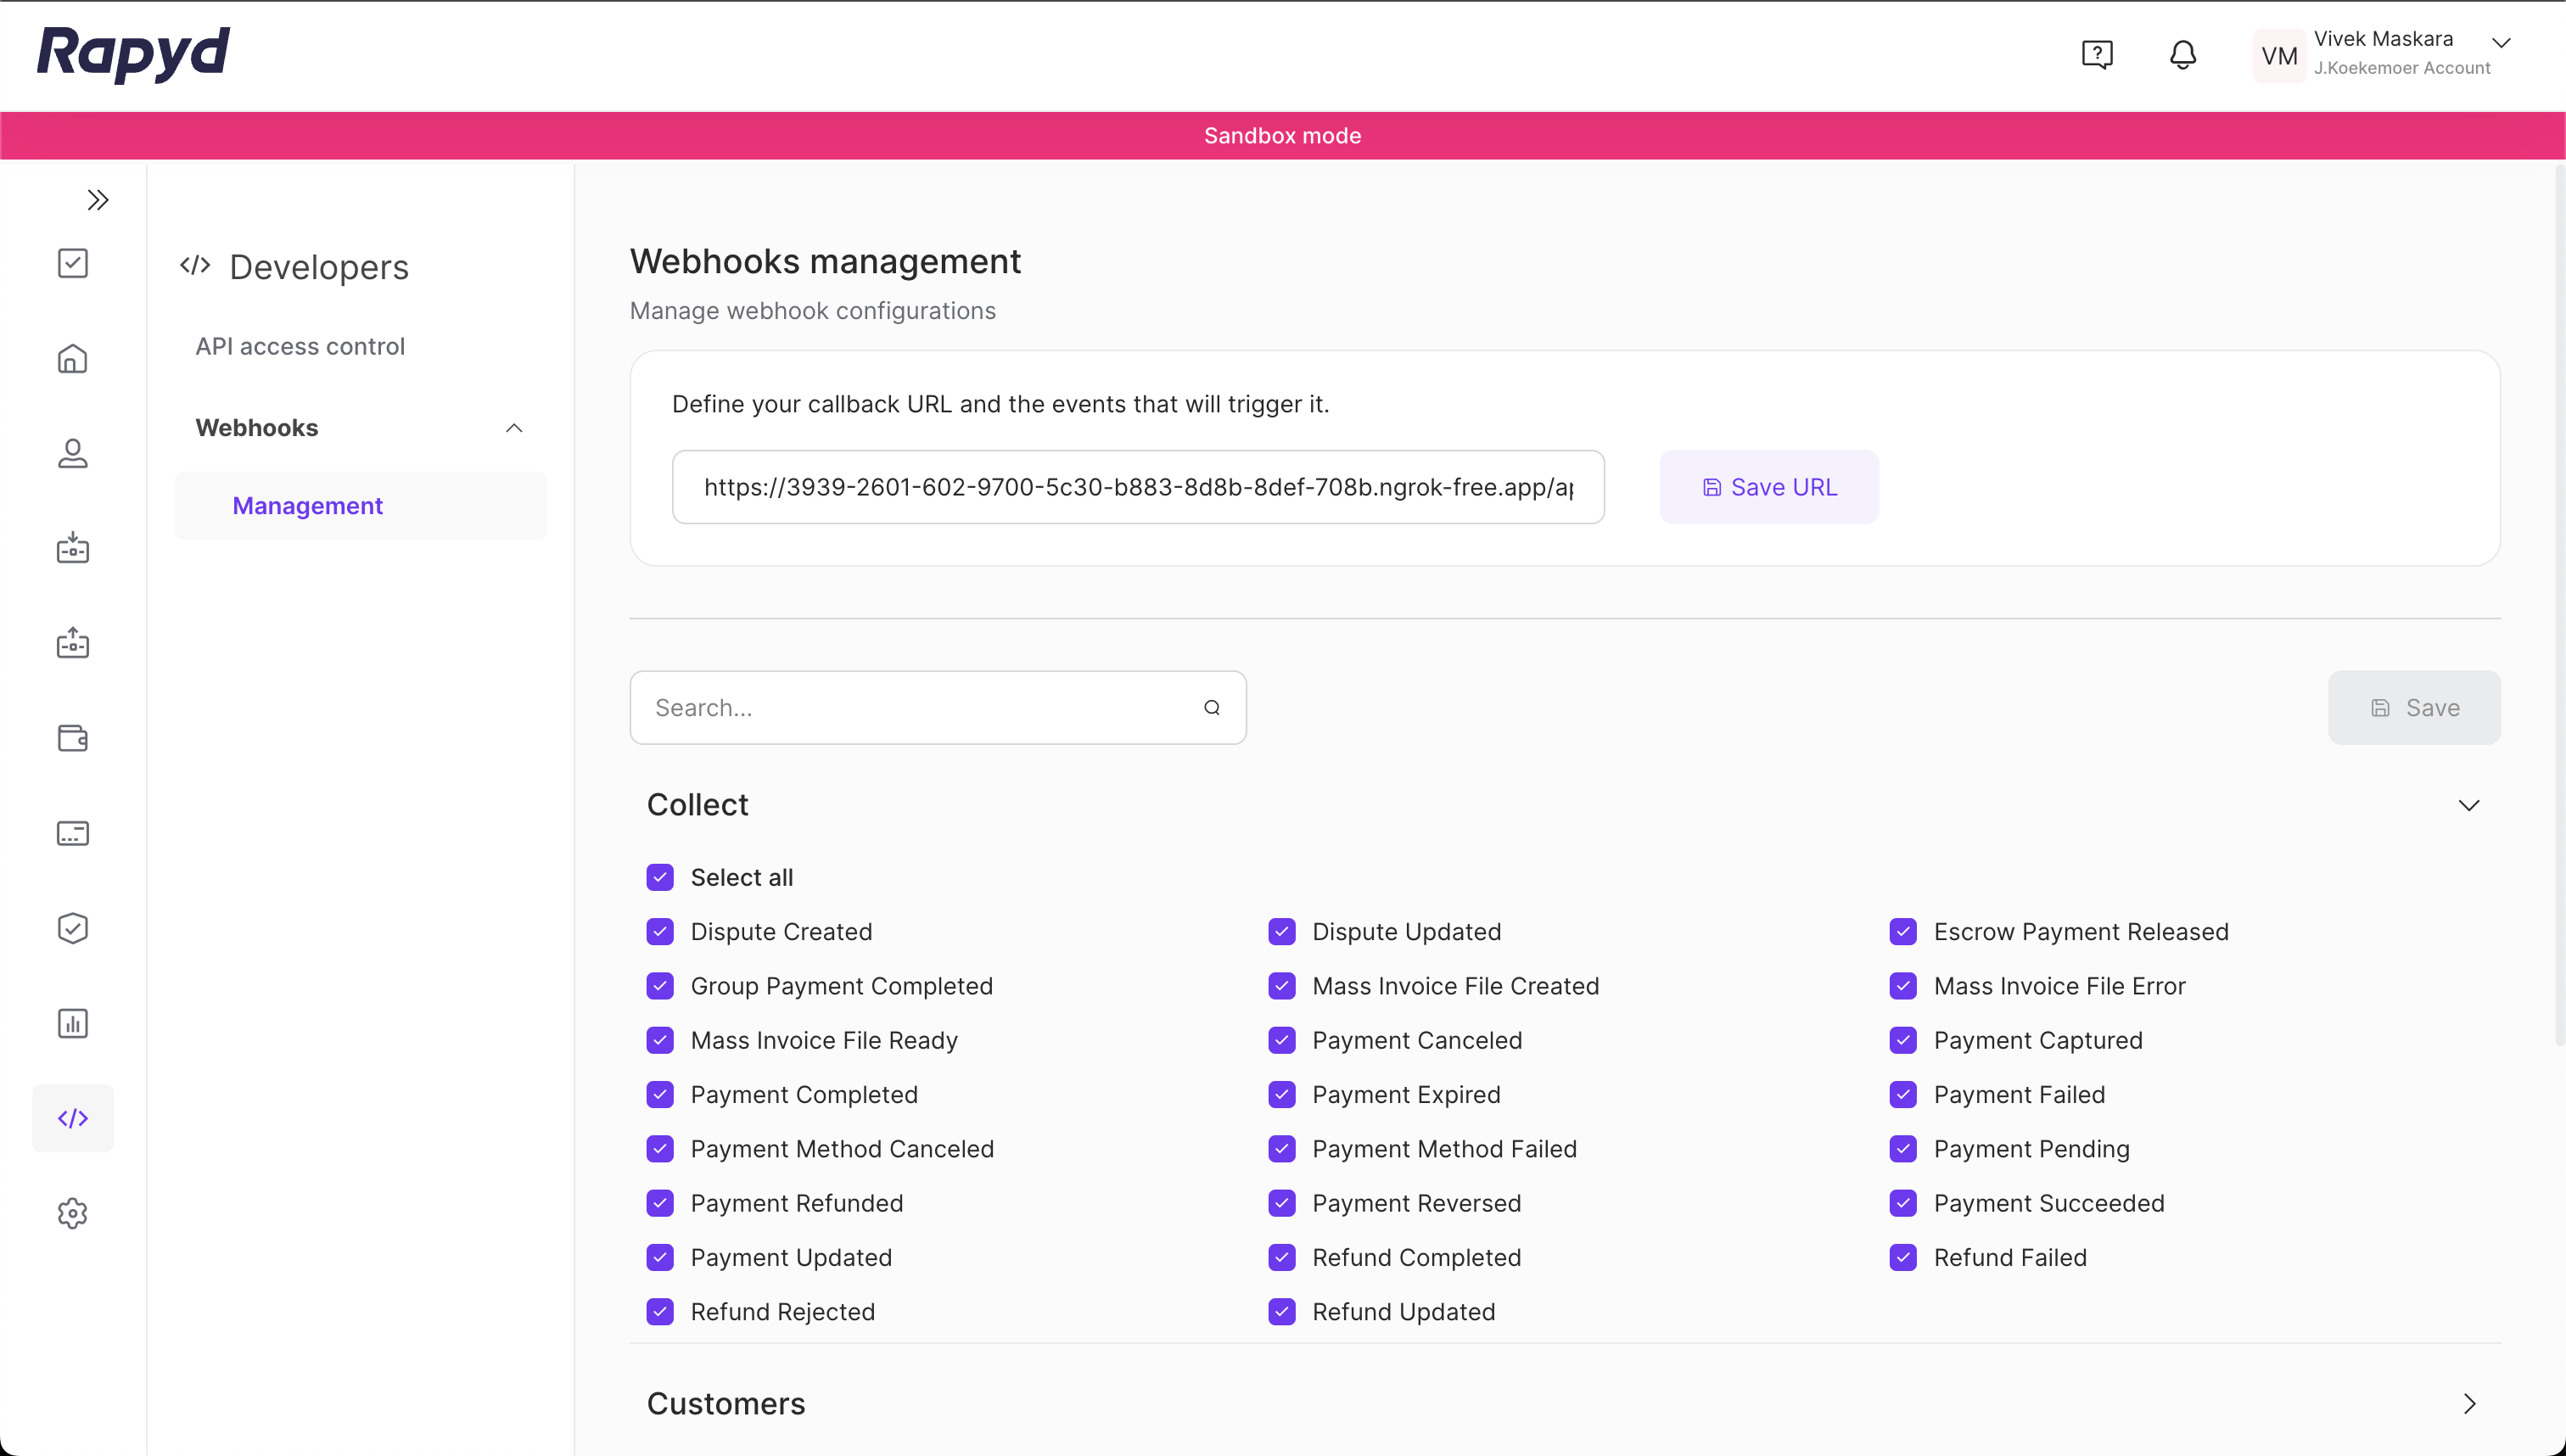
Make sure that under Collect, the Dispute Created webhook event is checked to ensure that your web server receives it.
Test Automatic Dispute Resolution
The Simulating Cardholder Disputes guide lists a few card numbers that you can use to simulate a card payment dispute. When one of these cards is used to create a payment, Rapyd simulates a dispute flow by automatically creating a dispute for the completed payment.
To simulate a transaction dispute with a Mastercard card, execute the following curl command:
curl --location 'https://<YOUR_FORWARDING_HOST_NAME>/api/payment' \
--header 'Content-Type: application/json' \
--data-raw '{
    "amount": 26.51,
    "currency": "ZAR",
    "merchant_reference_id": "042620221450",
    "payment_method": {
        "type": "gb_mastercard_card",
        "fields": {
            "number": "5132803130357186",
            "expiration_month": "11",
            "expiration_year": "26",
            "cvv": "123",
            "name": "John Doe"
        }
    },
    "ewallets": [
        {
            "ewallet": "<YOUR_RAPYD_EWALLET_ID>",
            "percentage": 100
        }
    ],
    "metadata": {
        "merchant_defined": "created"
    },
    "capture": true,
    "payment_method_options": {
        "3d_required": false
    }
}'
Replace <YOUR_FORWARDING_HOST_NAME> with the ngrok hostname and <YOUR_RAPYD_EWALLET_ID> with your Rapyd wallet ID before executing the curl command. Once you execute the command, a payment is created, and within seconds, you’ll receive a payment dispute webhook event for it. The dispute details are logged by the web server and look similar to this:
{
  ...
  "body": {
    ...
    "data": {
      "id": '0d37f5ca-0e7d-4c27-8476-2d3309e465b4',
      "token": 'dispute_8b36175b2121c5f4dffa9b624eb73b49',
      "status": 'ACT',
      "amount": 26.51,
      "currency": 'ZAR',
      "dispute_category": 'Cardholder Dispute',
      "dispute_reason_description": 'Cardholder Dispute',
      "original_transaction_currency": 'ZAR',
      "original_transaction_amount": 26.51,
      "original_dispute_amount": 26.51,
      "original_dispute_currency": 'ZAR',
      "original_transaction_id": 'payment_e5e014d419632d428023fcd5c8c3af53',
      ...
    }
  }
}
Because you configured the handleDisputeCreated method for Dispute Created events, it sends an email and logs the following to the console:
Dispute notification email sent: 250 2.0.0 OK  1751833493 d9443c01a7336-23c8455d09esm68323335ad.90 - gsmtp
Email notification sent for dispute: dispute_e9388a0a90c7366a96541f6b759c7de4
The configured MERCHANT_EMAIL receives an email as shown here:

You can also review the dispute details using the Collect > Review & Protect > Disputes tabs on the Rapyd Client Portal:
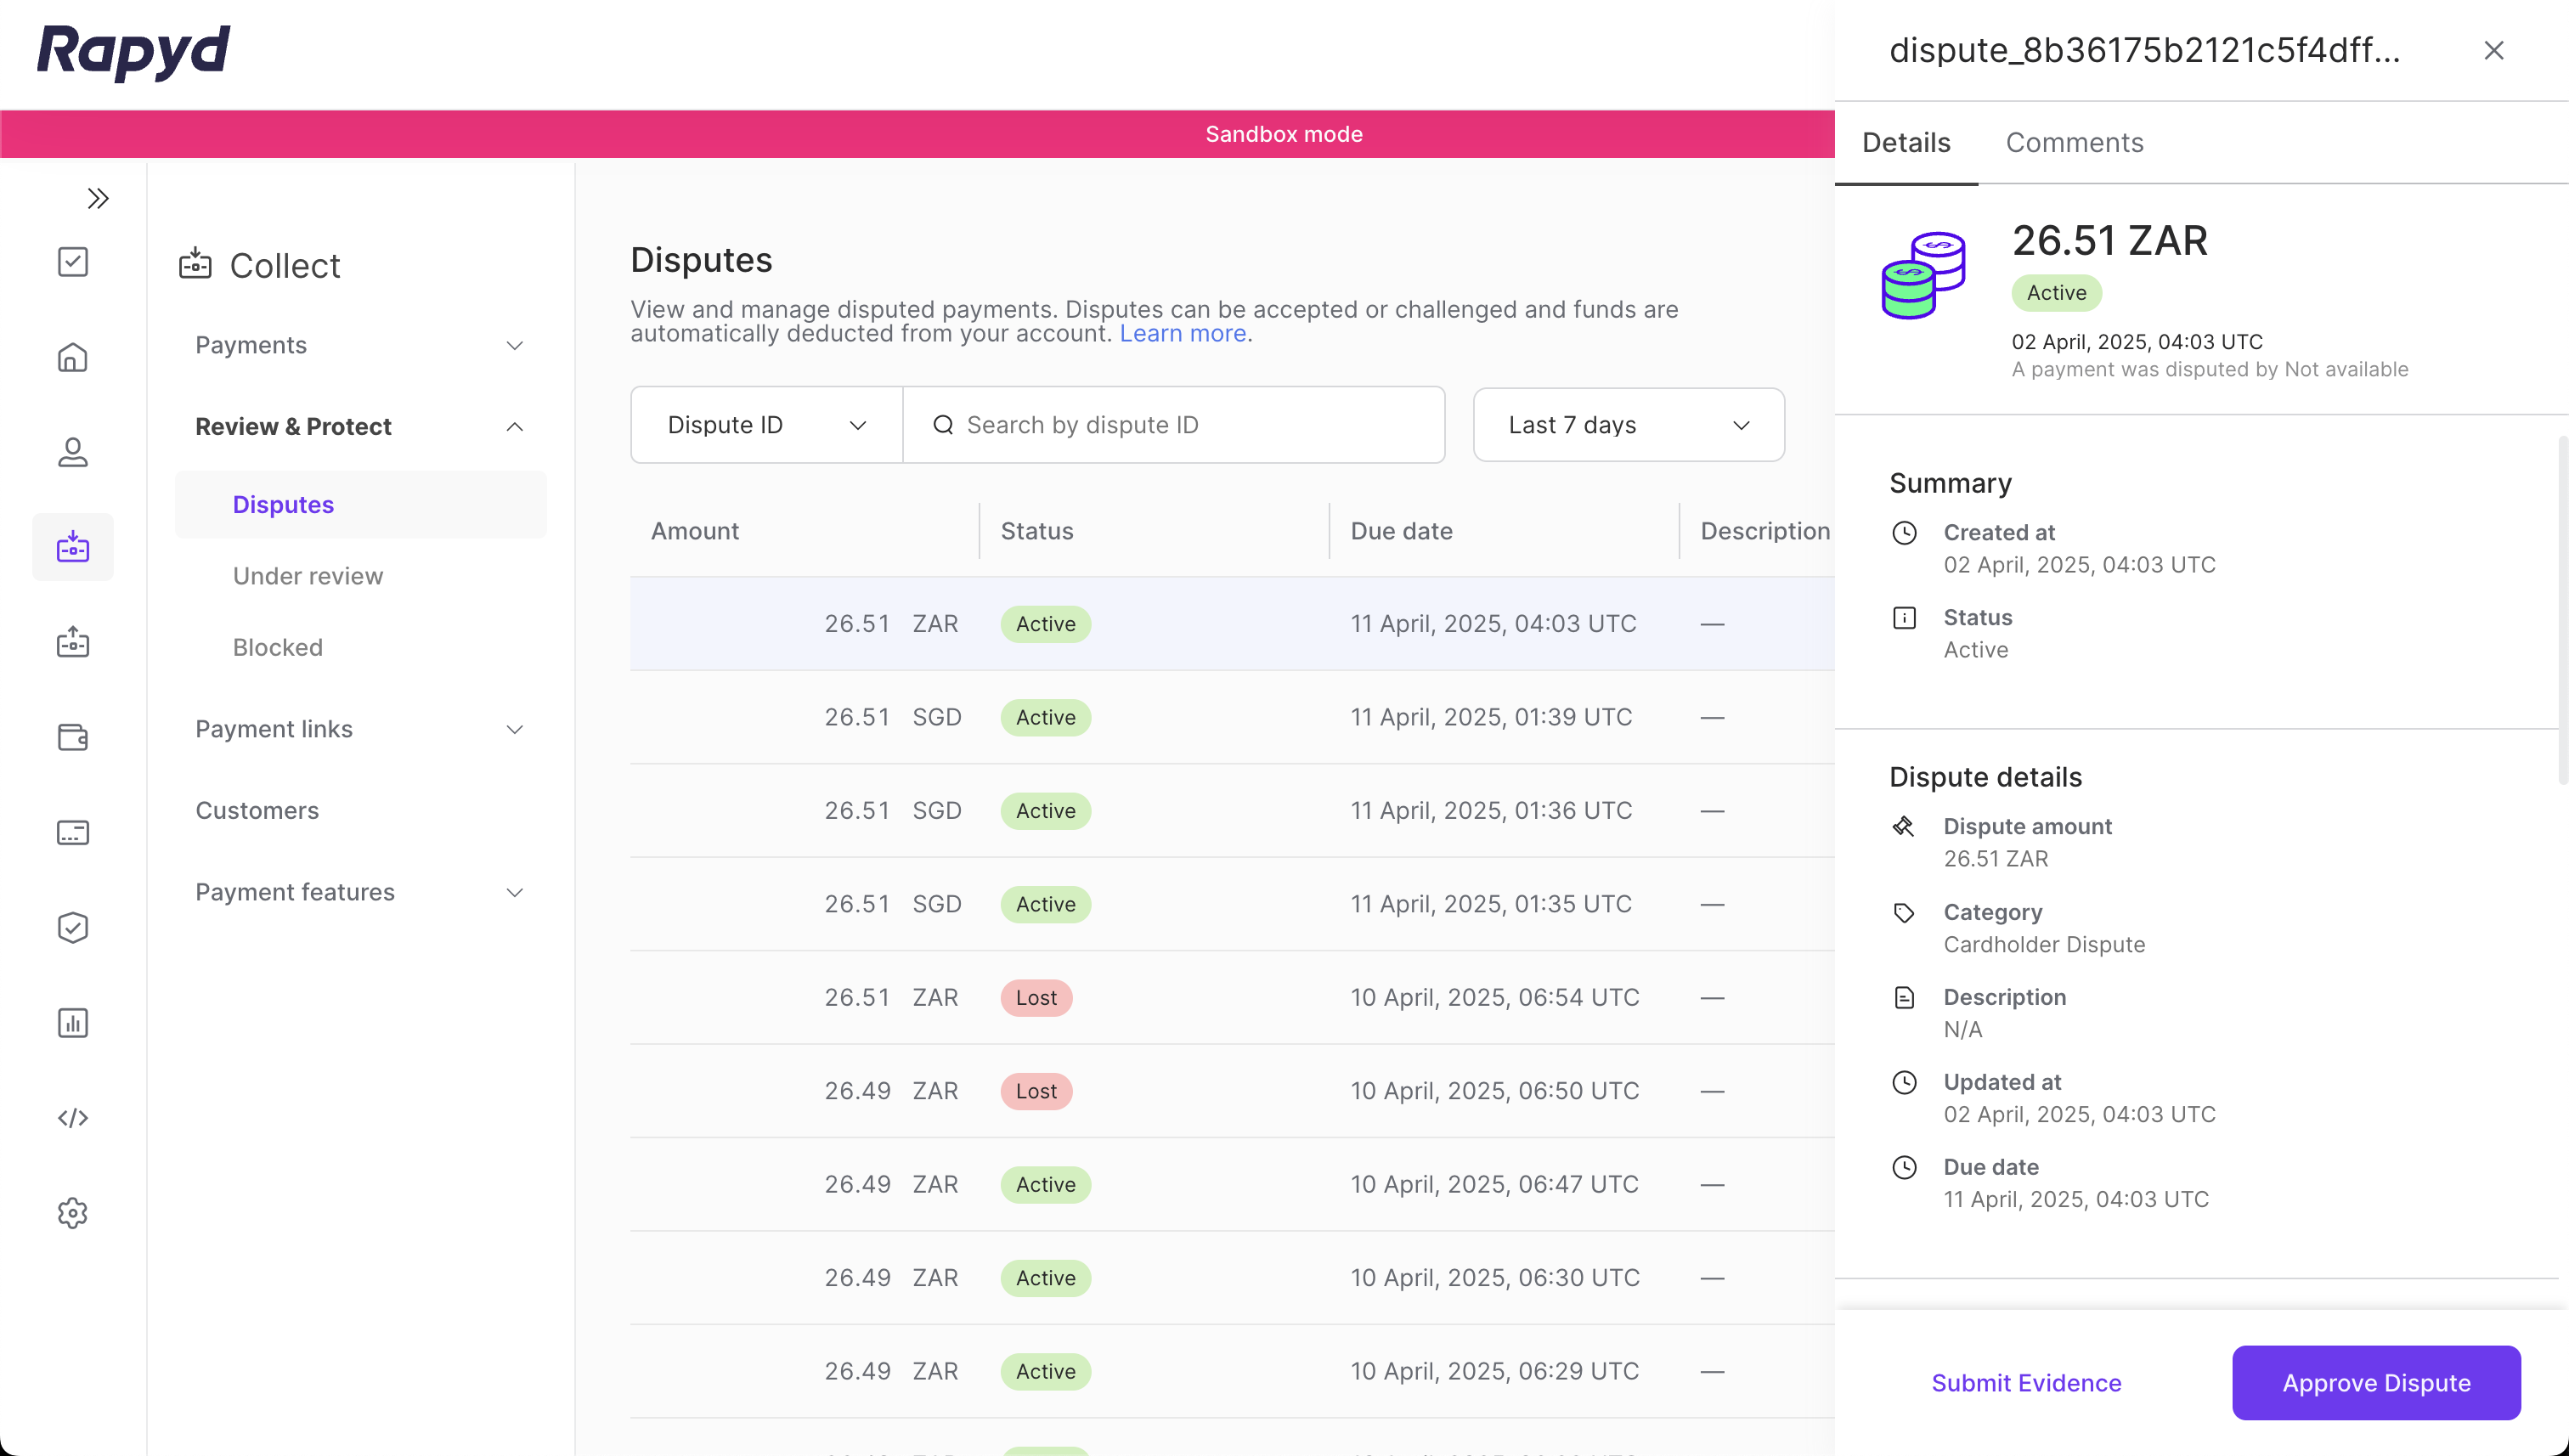
The Client Portal lets you update the status of the dispute, submit evidence, or refund a dispute.
You can find the entire source code used in this tutorial on GitHub.
Conclusion
Merchants need to proactively review and resolve card disputes to avoid chargebacks and revenue loss. They can leverage automatic dispute resolution tools like RDR and Mastercard Collaboration to configure rules that instantly evaluate dispute requests and issue automatic refunds if the criteria are met.
Rapyd enables businesses to automate dispute resolution by offering direct integration with Visa and Mastercard Collaboration programs, industry-leading authorization rates, and a robust all-in-one payment platform.
Try the Rapyd API and explore the code sample to see how Rapyd offers you the best in dispute resolution.